
Table of Contents
How to Setup Google Analytics 4 ( GA4 ) – A Complete Guide
Implementing GA4 on your Website
How to move FROM Enhanced Ecommerce tracking TO GA4 ecommerce tracking with Google Tag Manager
In this guide I will explain to you how to configure an E-commerce for tracking with Google Analytics 4, and – specifically – I will focus on how to move from the traditional Enhanced E-Commerce tracking to the new e-commerce tracking provided by Google Analytics 4 (it is no longer called “Enhanced E-commerce”, just simply “E-commerce”).
Why should I switch to GA4?
There are – at least – three good reasons to perform the switch:
1. the “traditional” e-commerce tracking, which involves setting Enhanced E-commerce on Universal Analytics (the version of Google Analytics prior to GA4), is going to be progressively replaced by the new tracking based on Google Analytics 4. In other words, sooner or later, the “traditional” e-commerce tracking will probably be discontinued.
2. the GA4-based e-commerce tracking, which unlike the previous one can be set with a Template that allows you to move from the traditional session-based tracking model to the new event-based model. This means your tracking can be much more accurate than before, because in the new GA4 there are many more events than in the “traditional” Google Analytics (Universal Analytics).
3. the use of GA4 allows you to start using Google’s machine learning models, which are able to predict the future actions of our users (eg. the purchases they will make through a Predictive Custom Audience), analyzing the data related to their behavior. The technology is still in beta but already usable, and I definitely recommend you try it.
In order to track E-commerce in GA4, we will use the Template. You can find it in the official Google Tag Manager Gallery at this link:
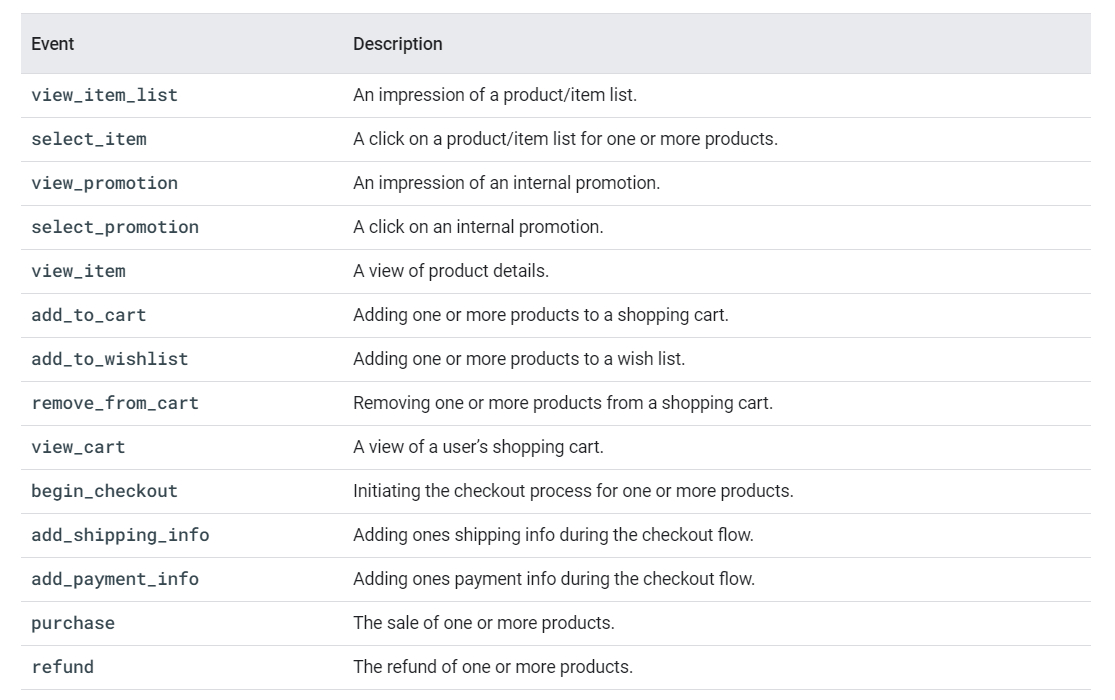
As I mentioned, GA4 is based on events. You can find the list of events managed by GA4 in the official guide:
The good news is that it is possible to reuse some of the actions present in the “traditional” Enhanced E-commerce settings (based on Google Universal Analytics) and to transform them into GA4 actions.
Let’s clarify this point. In this table you can find the GA Universal Analytics event list in Enhanced E-Commerce (EEC for friends) in the first column and the Google Analytics 4 event list in the second column:
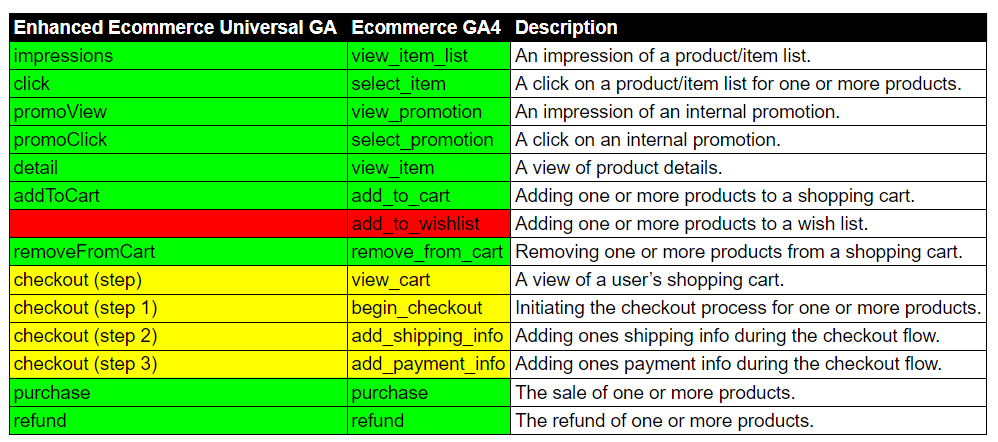
The green events are handled automatically by my Template, so no further configuration is needed
The yellow events will need a specific configuration of the variable. In detail, the step number of the Google Universal Analytics checkout event must be configured. The number indicated in brackets in the image above is the default number that the Template attributes (of course you can change it if the action of GA4 corresponds to a different step number)
The red event is not currently managed by my Template. This is because wishlist action management is not present in the “traditional” Google Universal Analytics.
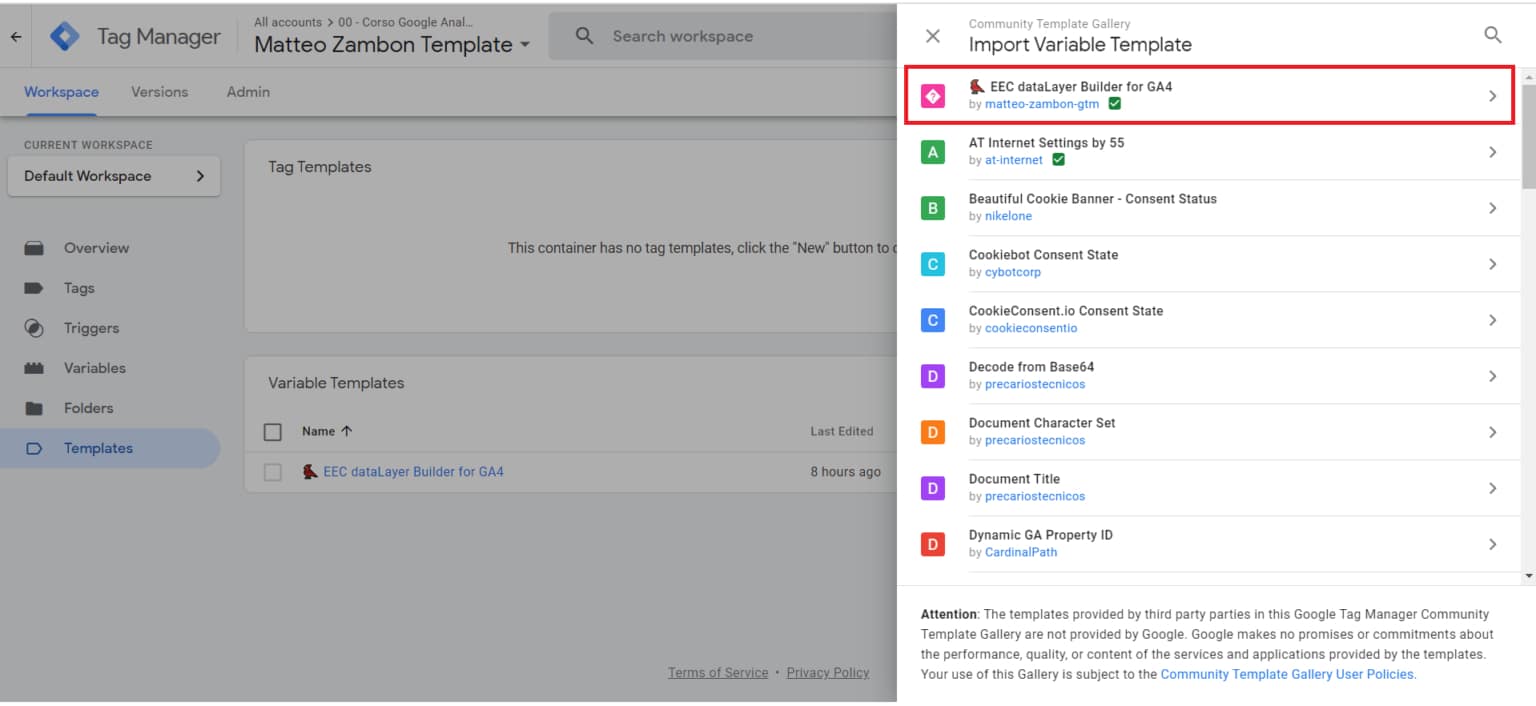
Step 1 – Import the “EEC dataLayer Builder for GA4 variable” Template
Import the Variable Template “EEC dataLayer Builder for GA4” You can find it in Google’s Community Template Gallery.
Just follow these steps:
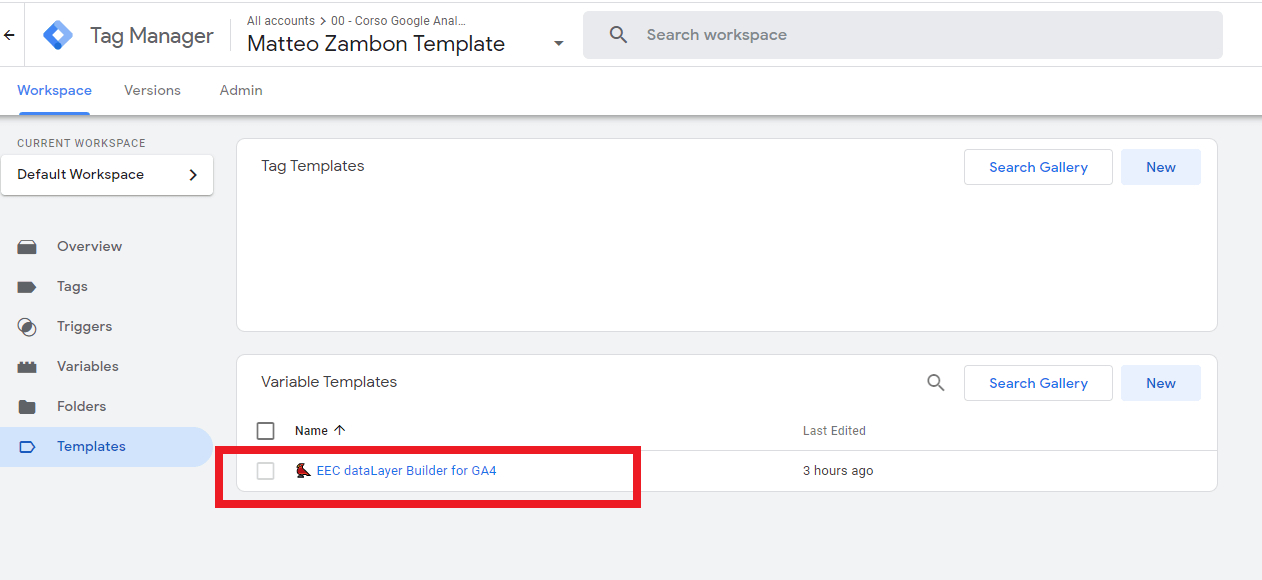
Templates > Variable Templates > Search Gallery
Search for EEC dataLayer Builder for GA4 and click on “Add to Workspace“
The EEC dataLayer Builder for GA4 Template that you just imported will look like this:
Now we just have to use this Template to create two custom variables.
Step 2 – Create the two custom variables for GA4
Now you will need to create two custom variables:
1. the GA4 – Event Name variable, which will manage the name of the e-commerce event
2. the GA4 – Items variable, which will manage an object that contains all the parameters
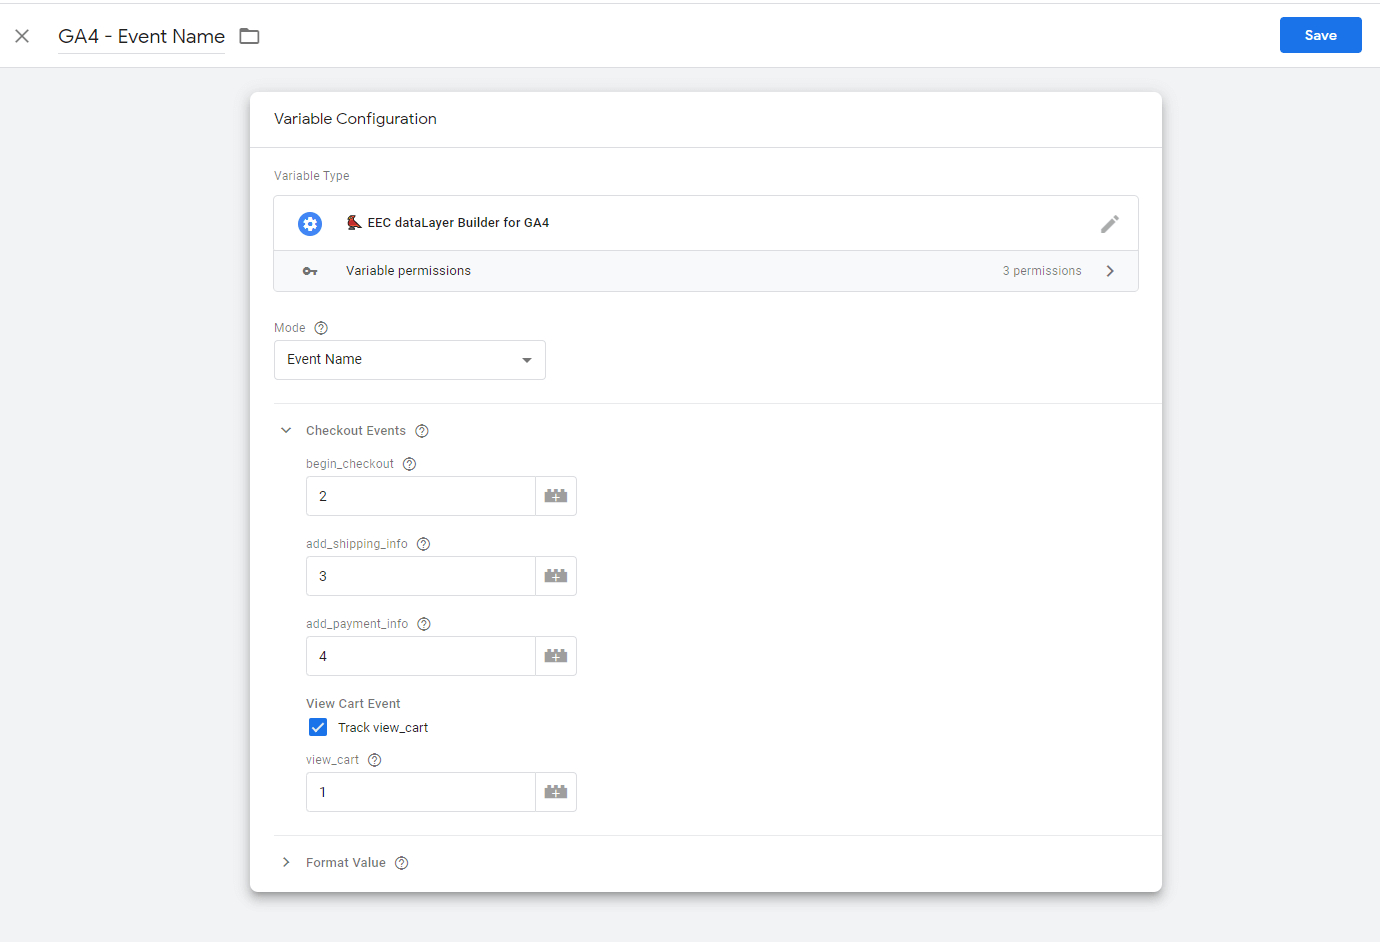
Configure the variable GA4 – Event Name
GA4 – Event Name has the purpose of uniquely identifying the name of the standard event to be passed to GA4 for e-commerce tracking purposes.
Here is how to do it:
- Go to Variables > User-Defined Variables
- Click on New and choose EEC dataLayer Builder for GA4
- On the Mode listbox select Event Name
- Checkout Events > enter the numbers of the checkout steps that will correspond to begin_checkout, add_shipping_info and add_payment_info
- View Cart Event: if you want to track it, select it and enter the step number
- Variable name: GA4 – Event Name
- Save
Here are the step values that you will find in the image below:
- 1 – view_cart (this is not enabled by default)
- 2 – begin_checkout (the default step is 1)
- 3 – add_shipping_info (the default step is 2)
- 4 – add_payment_info (the default step is 3)
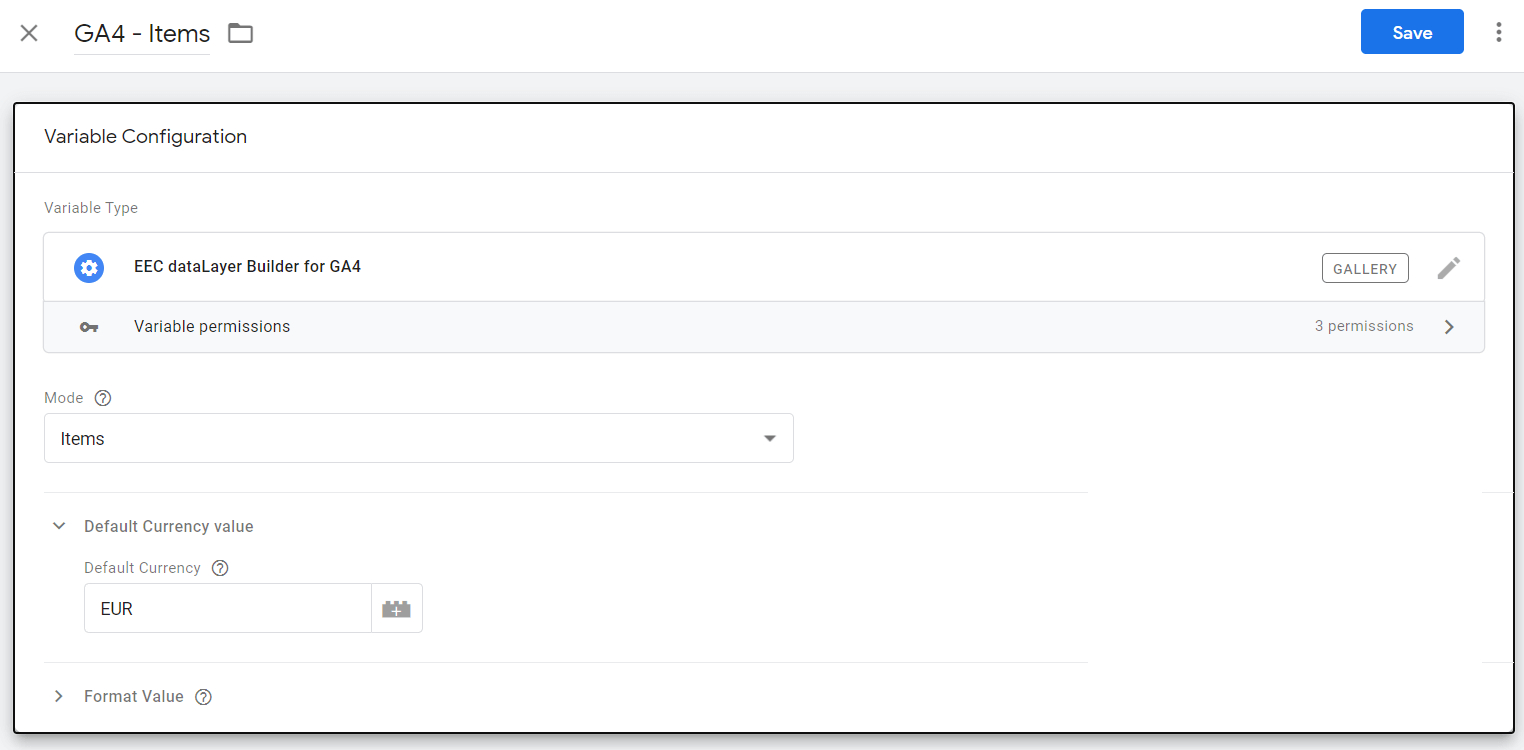
Configure the variable GA4 – Items
GA4 – Items has the purpose of managing the object items which will contain all the information needed for GA4.
In detail, the object will manage two possible scenarios:
first scenario: the dataLayer push for the “traditional” Enhanced Ecommerce di Google Universal Analytics
second scenario: the dataLayer push for the new Ecommerce di Google Analytics 4
Thanks to the management of both these scenarios, with this variable you will always have the correct structure for Google Analytics 4 🙂
Here are the steps to follow for this configuration:
- Go to Variables > User-Defined Variables
- Click on New and choose> EEC dataLayer Builder for GA4
- On the Mode listbox select Items
- Default Currency value: EUR (you can insert a different default value currency)
- Variable name GA4 – Items
- Save
Step 3 – Create the dataLayer variables for purchase and refund
Unfortunately, the purchase and refund event must handle some parameters – seven to be precise – that are outside the object items.
In detail, the seven parameters to be handled are:
- transaction_id
- affiliation
- value
- tax
- shipping
- currency
- coupon
These parameters are all contained in different positions inside the GTM dataLayer, depending on whether the dataLayer push was done for Google Universal Analytics or Google Analytics 4.
If you want to handle both the configurations (but this is a very unlikely case) then you would have to create 14 dataLayer variables in GTM.
The first scenario (Google Universal Analytics)
Let’s assume that you only have to manage the dataLayer of the Enhanced Ecommerce of Google Universal Analytics (this is the first of the two scenarios that I mentioned earlier).
Let’s start by creating one Variable for each of the seven parameters.
Here’s how to do it:
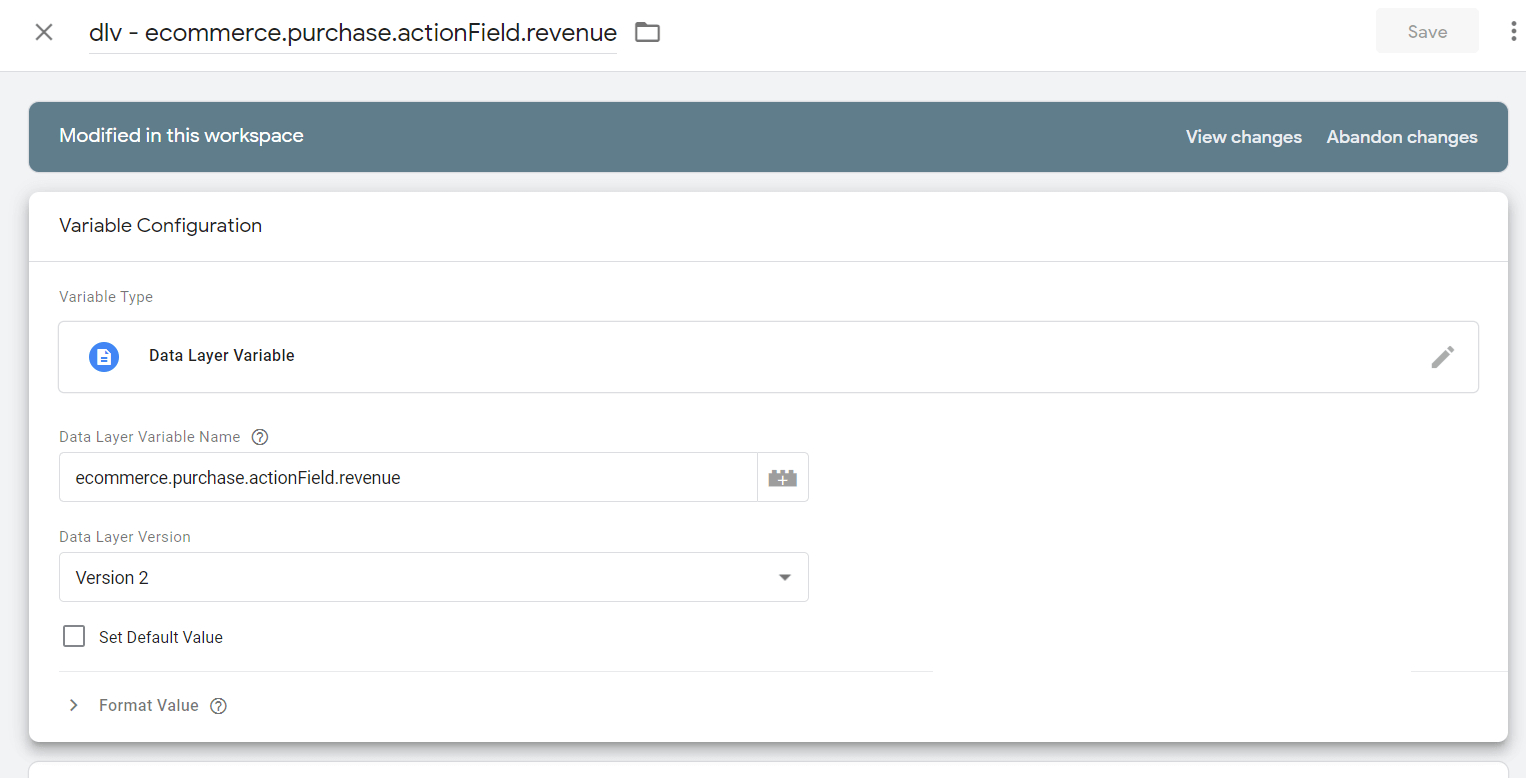
- Go to Google Tag Manager > Variables > User Defined Variables > New > Variable Configuration
- Variable type: Data Layer Variable.
- Data Layer Variable Name: ecommerce.purchase.actionField.revenue
- Data Layer version: Version 2.
- Rename the Variable “dlv – ecommerce.purchase.actionField.revenue” and save it.
The configuration should look like this:
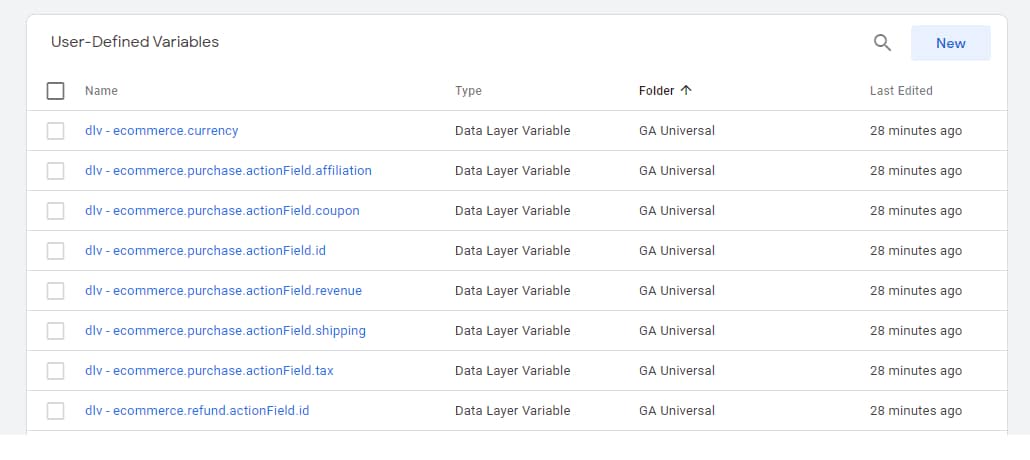
Now you just have to repeat this operation 6 times, changing the value to red for the other variables with:
- ecommerce.purchase.actionField.affiliation
- ecommerce.purchase.actionField.coupon
- ecommerce.purchase.actionField.id
- ecommerce.purchase.actionField.shipping
- ecommerce.purchase.actionField.tax
- ecommerce.currencyCode
Rename all variables by adding a simple prefix: “dlv –”
Please be careful about ecommerce.currencyCode
This parameter is optional in Google Universal Analytics, but it is required in Google Analytics 4. If you don’t pass the currency parameter in GA4, the transaction event has some problems.
My suggestion is to check “Set Default Value” and insert “EUR” (if your e-commerce has Euro currency by default).
- ecommerce.refund.actionField.id
Once this is done, you should have a list like this:
The second scenario (GA4 – Google Analytics 4)
In the second scenario relating to the management of GA4 events that I described above, you need to create only the variables relating to the management of GA4.
(In this case, the dataLayer push is already passing the object items.)
Consequently, the seven dataLayer variables to create are:
- ecommerce.affiliation
- ecommerce.coupon
- ecommerce.currency
- ecommerce.shipping
- ecommerce.tax
- ecommerce.transaction_id
- ecommerce.value
(In the following steps I will not consider this second scenario, and I will refer exclusively to the first scenario).
Step 4 – Create GA4 Tag Triggers
Now you just have to identify the name of the events in Google Universal Analytics (you should already have the event list if you have already implemented the Google Analytics Enhanced E-Commerce).
It all depends on how Enhanced E-commerce has been implemented, for example through modules / plugins in your CMS (WooCommerce, Prestashop, Magento, Shopify, etc), or through a custom software solution crafted by a software engineer.
[NOTE] It is possible that some pushes in the dataLayer to manage actions such as: promo impression, detail, checkout or purchase, were performed before the GTM event Container Loaded (ex Page View) and were performed without having declared the name of the event.
(By the way, if you do not declare the name of the event, you should get a slap on the wrist!)
The trick – or #barbatrucco, in Italian slang – to manage this situation (handling Message events in GTM debug) is to use GTM’s “All Pages” native trigger.
Also, if the transaction event (purchase) is done BEFORE the Container Loaded native event, then you will need to create a negative trigger and put it as exception to the Google Analytics 4 Tag which does not handle the transaction (purchase). This is because you would trigger the transaction (purchase) events two times. Don’t worry, you will see it well in step 5.
For the sake of simplicity, I will separate the actions purchase and refund from the other actions.
(I don’t think I have ever seen the action refund configured in Google Analytics).
In this example, I will use the WooCommerce implementation with the Duracell Tomi plugin.
Please note that in this example there are two actions that are not handled with a specific event:
- detail (product detail)
- checkout (step 1 of the checkout)
(Duracell Tomi, you should definitely get a slap on the wrist for this!)
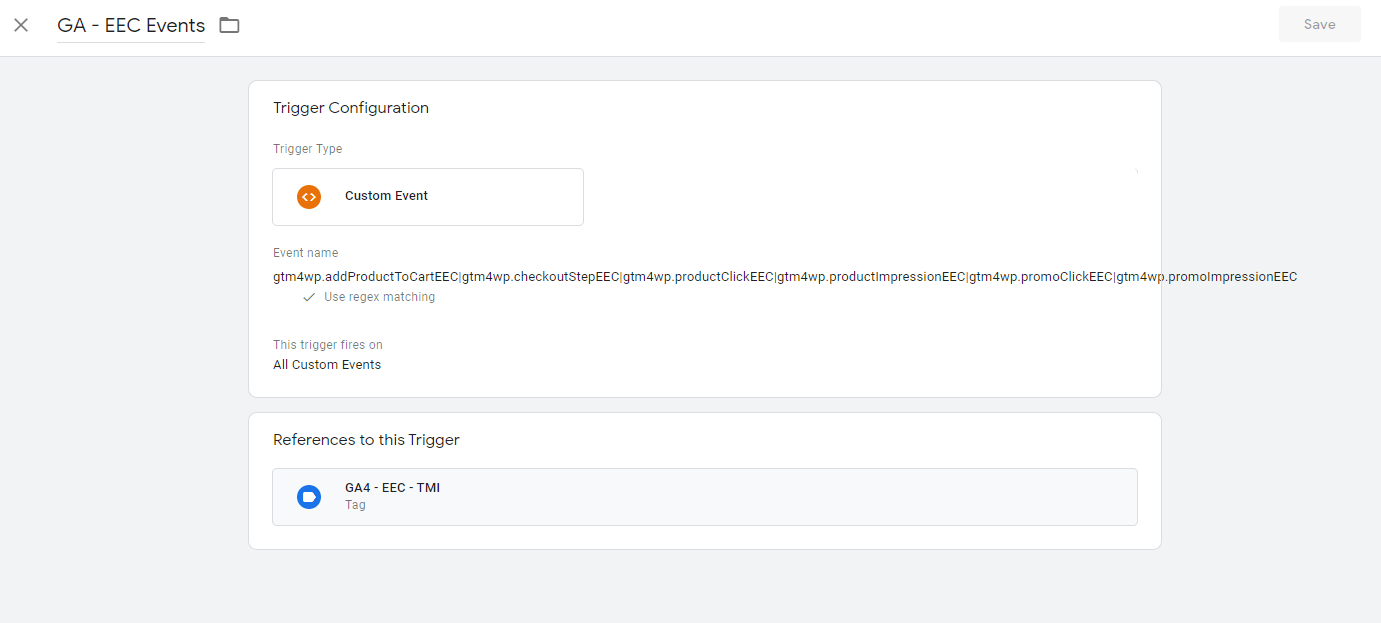
Create the trigger GA – EEC Events
My intent here is to track all GA’s Enhanced E-Commerce actions excluding purchase and refund.
- Click on Trigger > New > Trigger configuration
- Trigger type: Custom event
- Event Name: gtm4wp.addProductToCartEEC|gtm4wp.checkoutStepEEC|gtm4wp.productClickEEC|gtm4wp.productImpressionEEC|gtm4wp.promoClickEEC|gtm4wp.promoImpressionEEC|gtm4wp.removeFromCartEEC
- Flag: Use regex matching
- Fire this trigger fires on: All custom events
- Trigger name: “GA – EEC Events”
- Save
Create the Trigger GA – EEC Purchase
Here the intent is to track the purchase:
- Click on Trigger > New > Trigger configuration
- Trigger type: Custom event
- Event Name: gtm4wp.orderCompletedEEC
- Flag: Use regex matching
- Fire this trigger fires on: All custom events
- Trigger name: “GA – EEC Purchase”
- Save

Well, it was easier than expected, wasn’t it?
Let’s move on to the Tags and we’re done 🙂
Step 5 – Create the Google Analytics 4 Tags
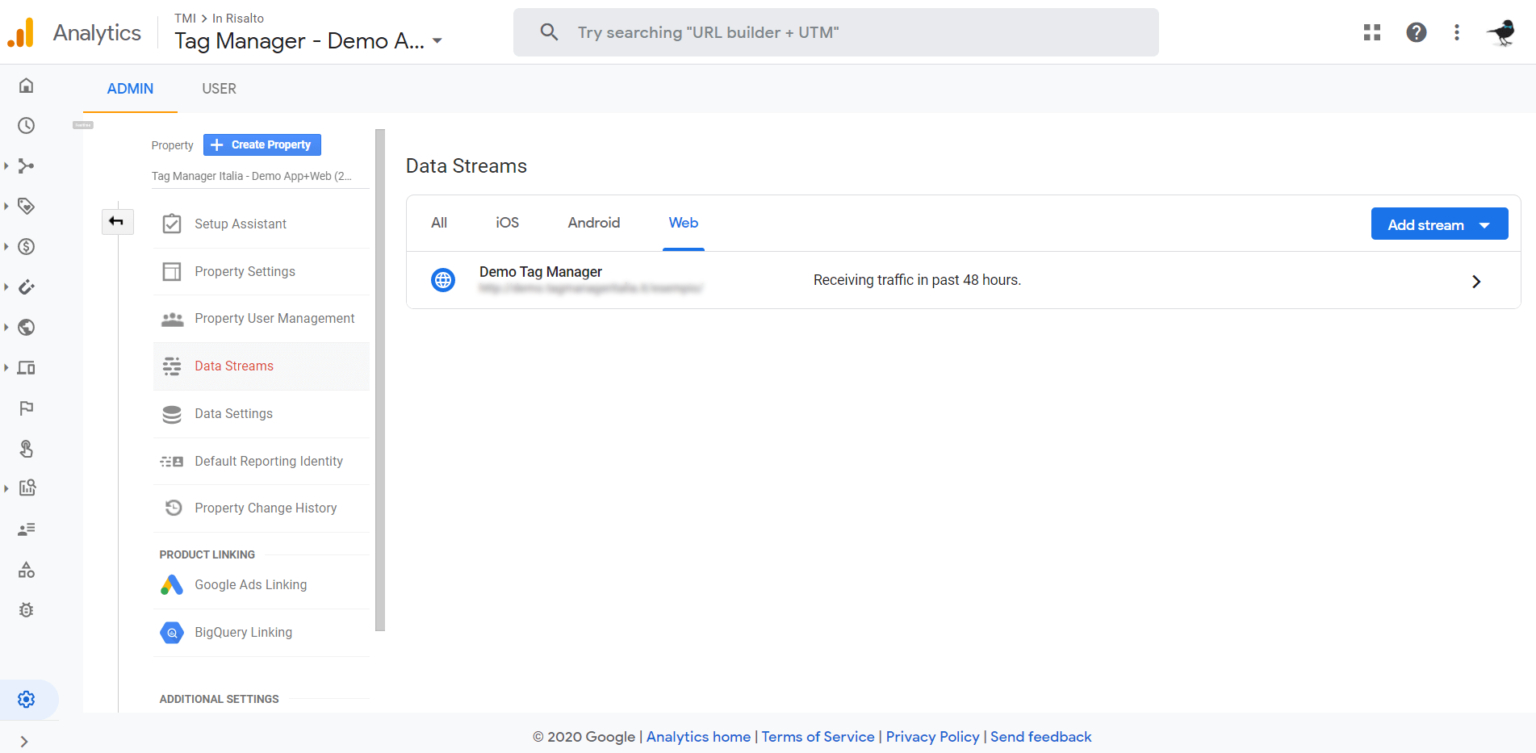
Create the Google Analytics 4 property and the data stream
You’ve probably already created your property in Google Analytics 4 and the Data Stream of your site.
Retrieve your Google Analytics 4 code G-XXXXXXXX from your data stream.
Well, now let’s move on to the creation of the Tags:
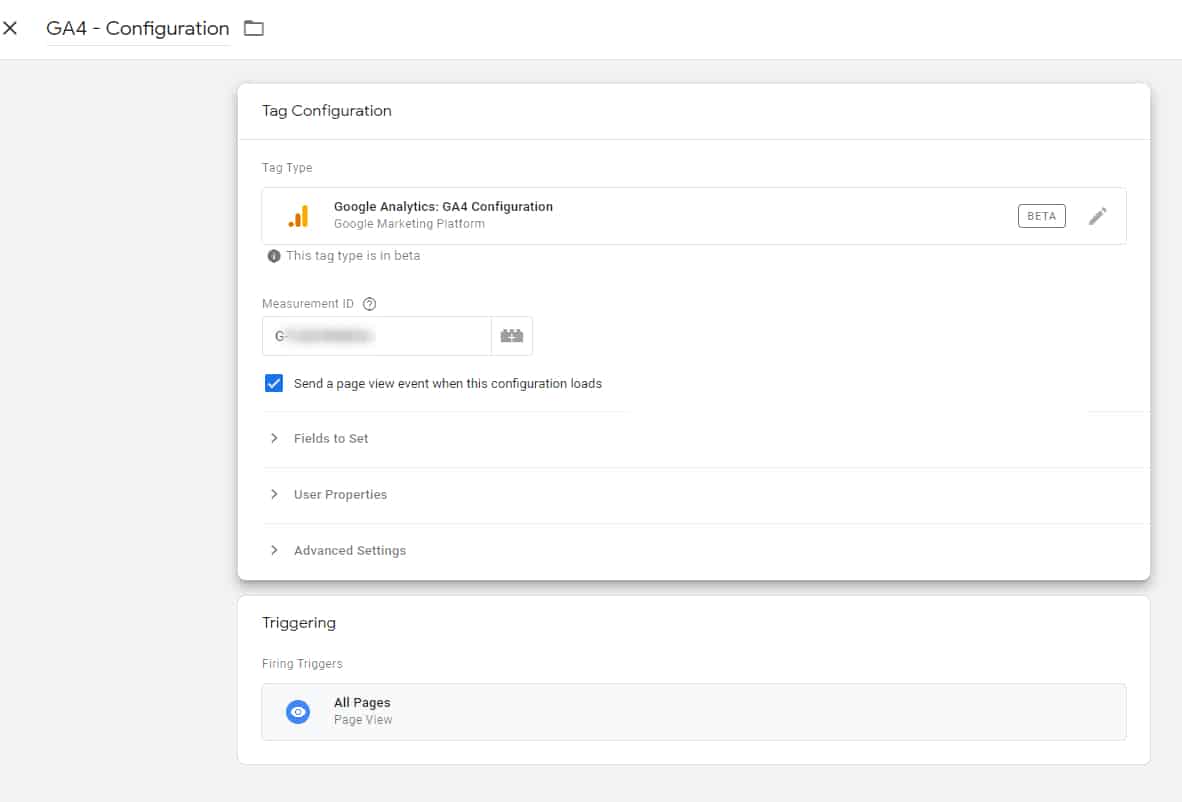
Create the GA4 Configuration Tag
The Google Analytics 4 Configuration Tag will allow us to more easily manage GA4 events in the Event Tags.
- Tag type: Google Analytics: GA4 Configuration
- Measurement ID: G-XXXXXXXXX
- Trigger: All Pages
- Tag Name: GA4 – Configuration
Create the two GA4 Event Tags to manage E-commerce tracking
This is the last step before the final verification with debugging.
Beware of triggers. As explained before in red if not all e-commerce actions are handled by a specific event and are pushed before Container Loaded we will need to use the “All Pages” activator as well.
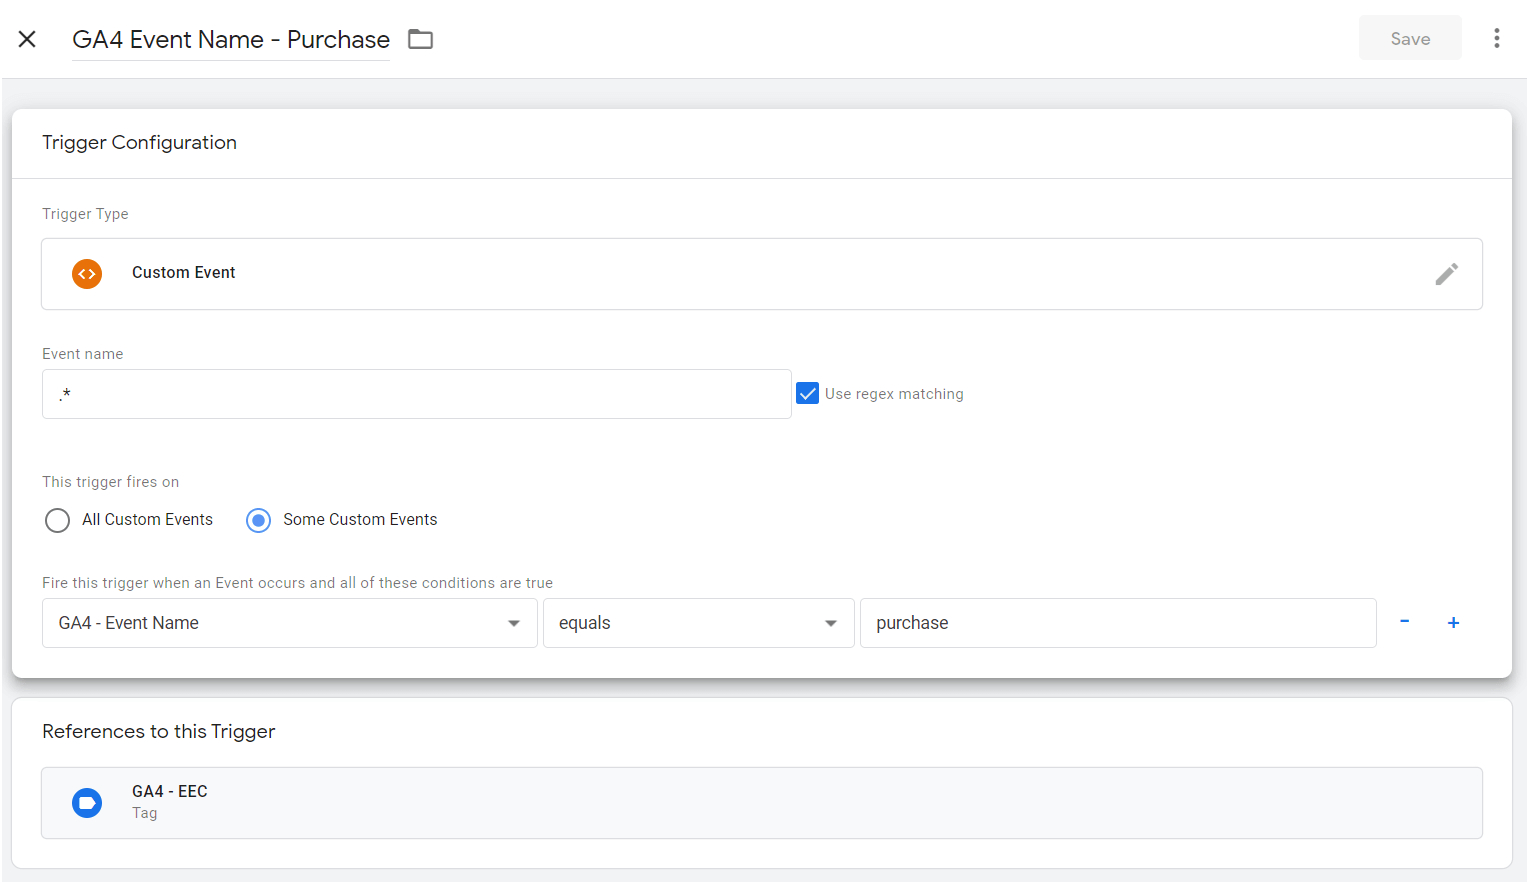
Also if the specific event of the transaction (in our case it will be gtm4wp.orderCompletedEEC) is pushed before the Container Loaded as in the image below:
then a universal negative trigger must be set up for the GA4 – EEC Tag.
This is the universal negative trigger for the purchase.
- Click on Trigger > New > Trigger configuration
- Trigger type: Custom event
- Event Name: .*
- Flag: Use regex matching
- Fire this trigger: GA4 – Event Name then choose equals and purchase
- Name: “GA4 Event Name – Purchase”
- Save.
So you have three possible cases, obviously, you will have to choose the one that best suits your situation:
case A
Select as trigger ► GA – EEC – Events
If there are pushes before Container Loaded that are not handled by a specific event ► also choose All Pages trigger
If your purchase event is pushed before Container Loaded ► create the negative trigger “GA4 Event Name – Purchase” and put it as an exception
case B
Select as trigger ► GA – EEC – Events
If there are pushes before Container Loaded that are not handled by a specific event ► also choose All Pages trigger
case C
If all events are declared then just choose ► GA – EEC – Events as trigger
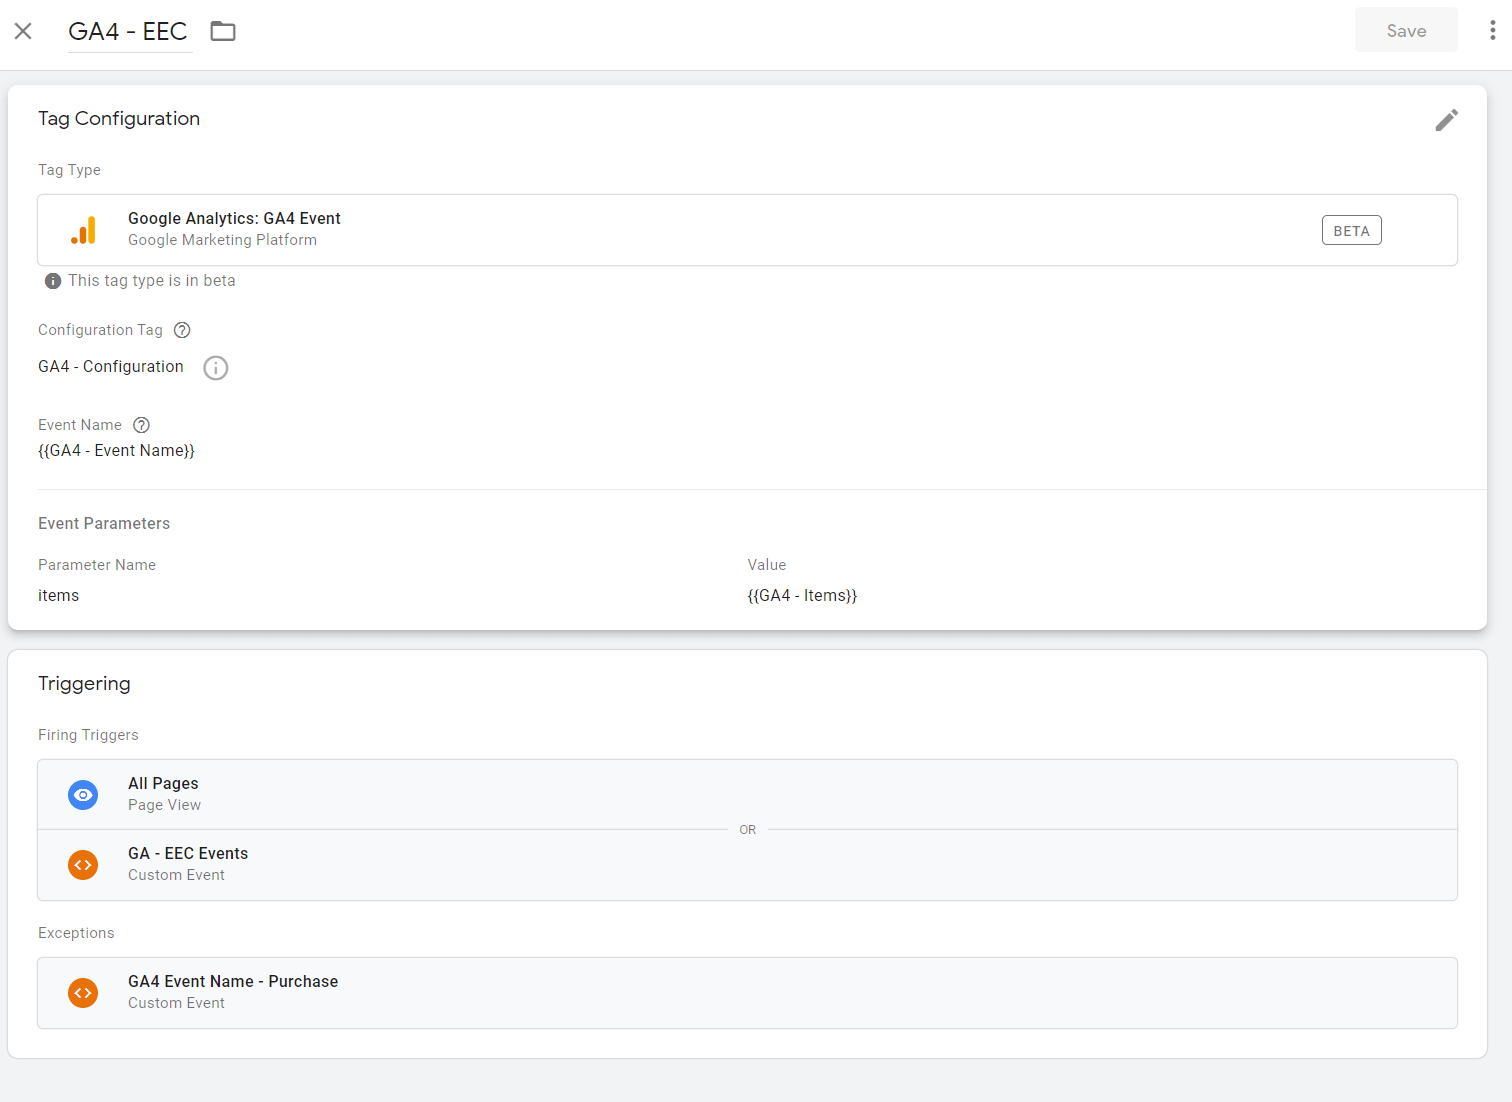
Case A
- Tag type: Google Analytics: GA4 Event
- Configuration Tag: choose from the list > GA4 – Configuration
- Event Name: choose the variable {{GA4 – Event Name}}
- Event Parameters: click on Add Row > Parameter Name: items > Value: choose the variable {{GA – Items}}
- Trigger: All Pages , then choose the Trigger GA – EEC – Events
- Exeptions: GA4 Event Name – Purchase
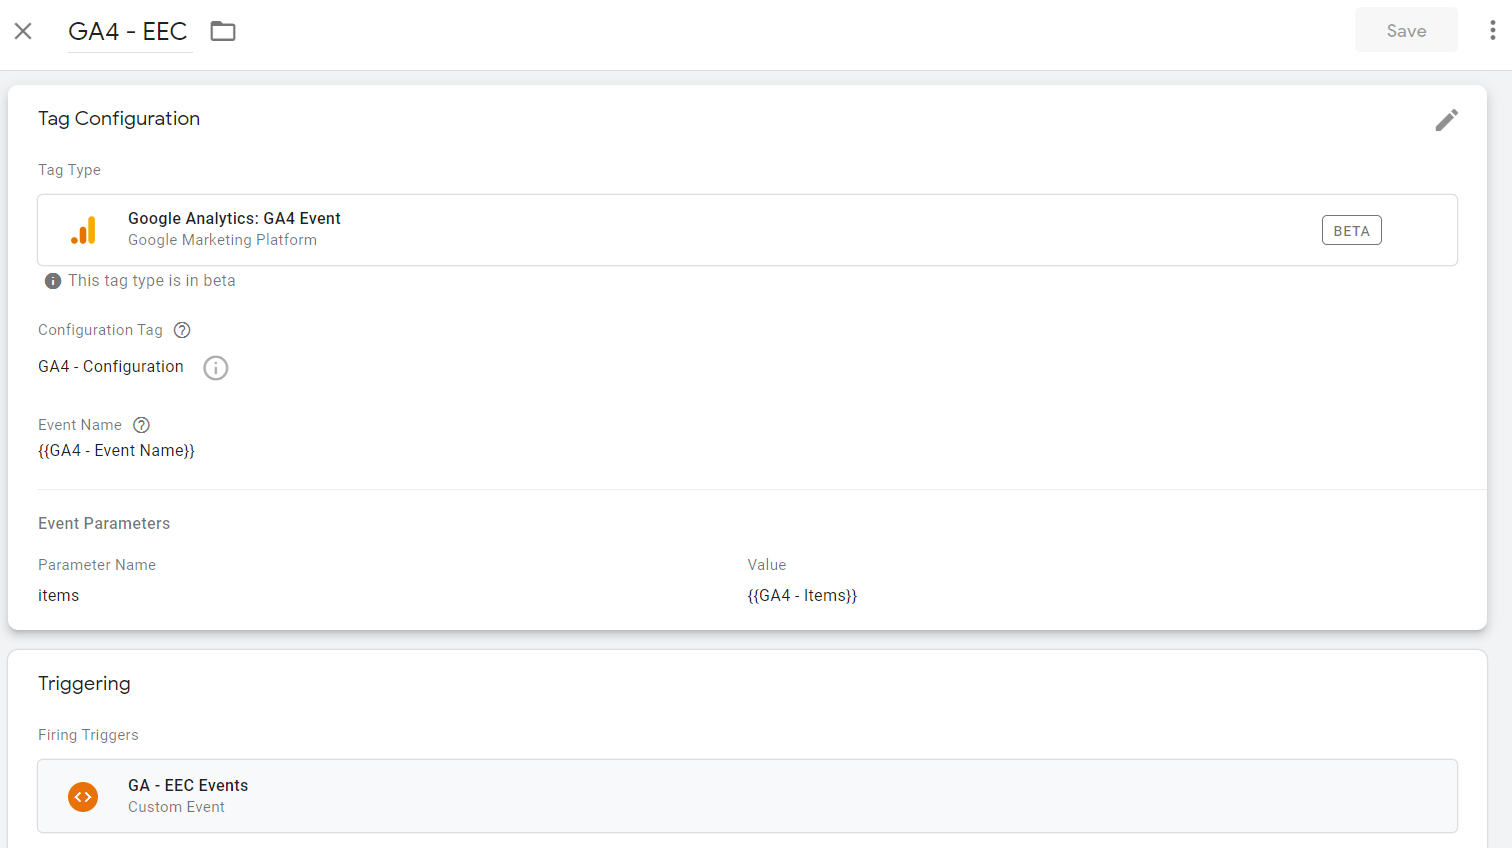
- Name: GA4 – EEC
- Save
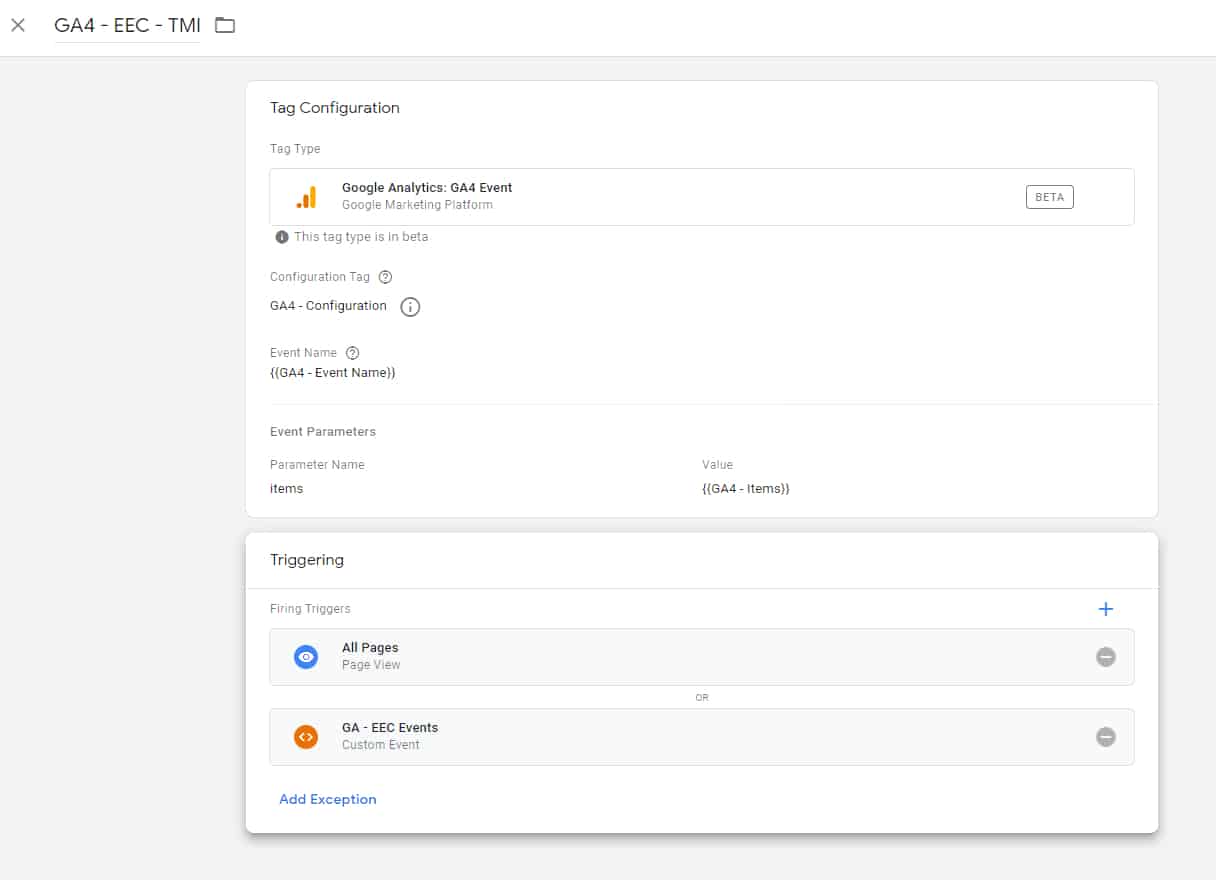
Case B
- Tag type: Google Analytics: GA4 Event
- Configuration Tag: choose from the list > GA4 – Configuration
- Event Name: choose the variable {{GA4 – Event Name}}
- Event Parameters: click on Add Row > Parameter Name: items > Value: choose the variable {{GA – Items}}
- Trigger: All Pages , then choose the Trigger GA – EEC – Events
- Name: GA4 – EEC
- Save
Case C
- Tag type: Google Analytics: GA4 Event
- Configuration Tag: choose from the list > GA4 – Configuration
- Event Name: choose the variable {{GA4 – Event Name}}
- Event Parameters: click on Add Row > Parameter Name: items > Value: choose the variable {{GA – Items}}
- Trigger: choose GA – EEC – Events
- Name: GA4 – EEC
- Save
My case (that of Woocommerce) is case A
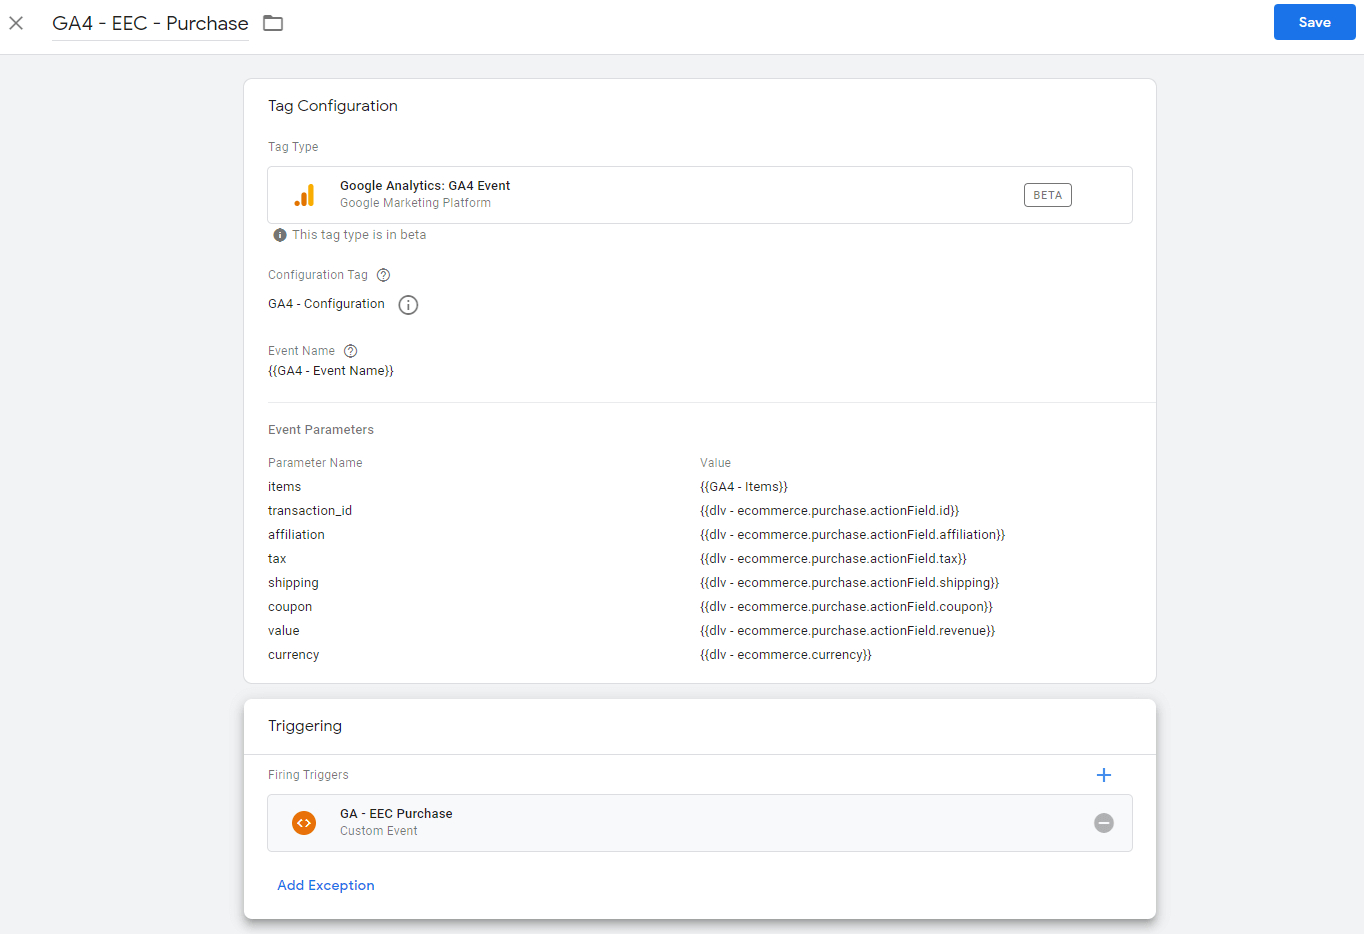
Now I am going to create the Tag for the action purchase because, as I mentioned before, I need to pass the seven additional parameters.
- Tag type: Google Analytics: GA4 Event
- Configuration Tag: choose from the list > GA4 – Configuration
- Event Name: choose the variable {{GA4 – Event Name}}
- Event Parameters: click on Add Row > Parameter Name: items > Value: choose the variable {{GA – Items}}
- Event Parameters: click on Add Row > Parameter Name: transaction_id > Value: choose the variable {{dlv – ecommerce.purchase.actionField.id}}
- Event Parameters: click on Add Row > Parameter Name: affiliation > Value: choose the variable {{dlv – ecommerce.purchase.actionField.affiliation}}
- Event Parameters: click on Add Row > Parameter Name: tax > Value: choose the variable {{dlv – ecommerce.purchase.actionField.tax}}
- Event Parameters: click on Add Row > Parameter Name: shipping > Value: choose the variable {{dlv – ecommerce.purchase.actionField.shipping}}
- Event Parameters: click on Add Row > Parameter Name: coupon > Value: choose the variable {{dlv – ecommerce.purchase.actionField.coupon}}
- Event Parameters: click on Add Row > Parameter Name: value > Value: choose the variable {{dlv – ecommerce.purchase.actionField.revenue}}
- Event Parameters: click on Add Row > Parameter Name: currency > Value: choose the variable {{dlv – ecommerce.currencyCode}}
- Trigger: GA – EEC – Purchase
- Name: GA4 – EEC – Purchase
- Save
Step 6 – Debug and verify GA4 operation
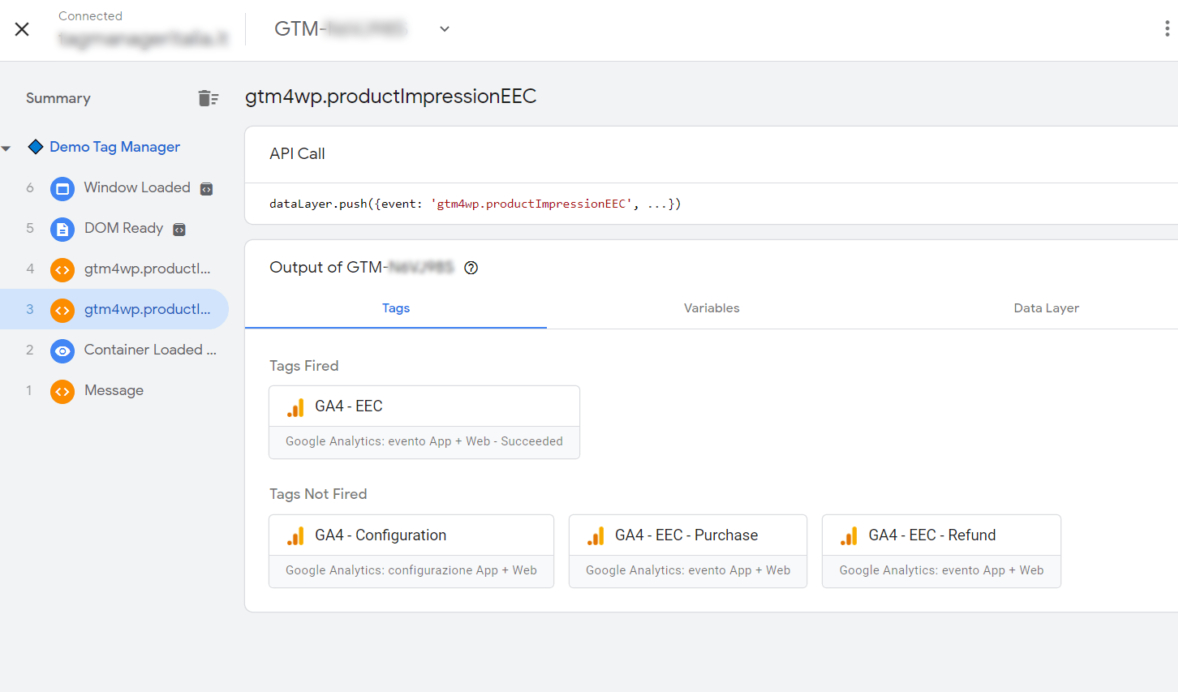
Activate the Google Tag Manager Debug Preview and check if the Tags are activated and if they actually manage the parameters in GA4 🙂
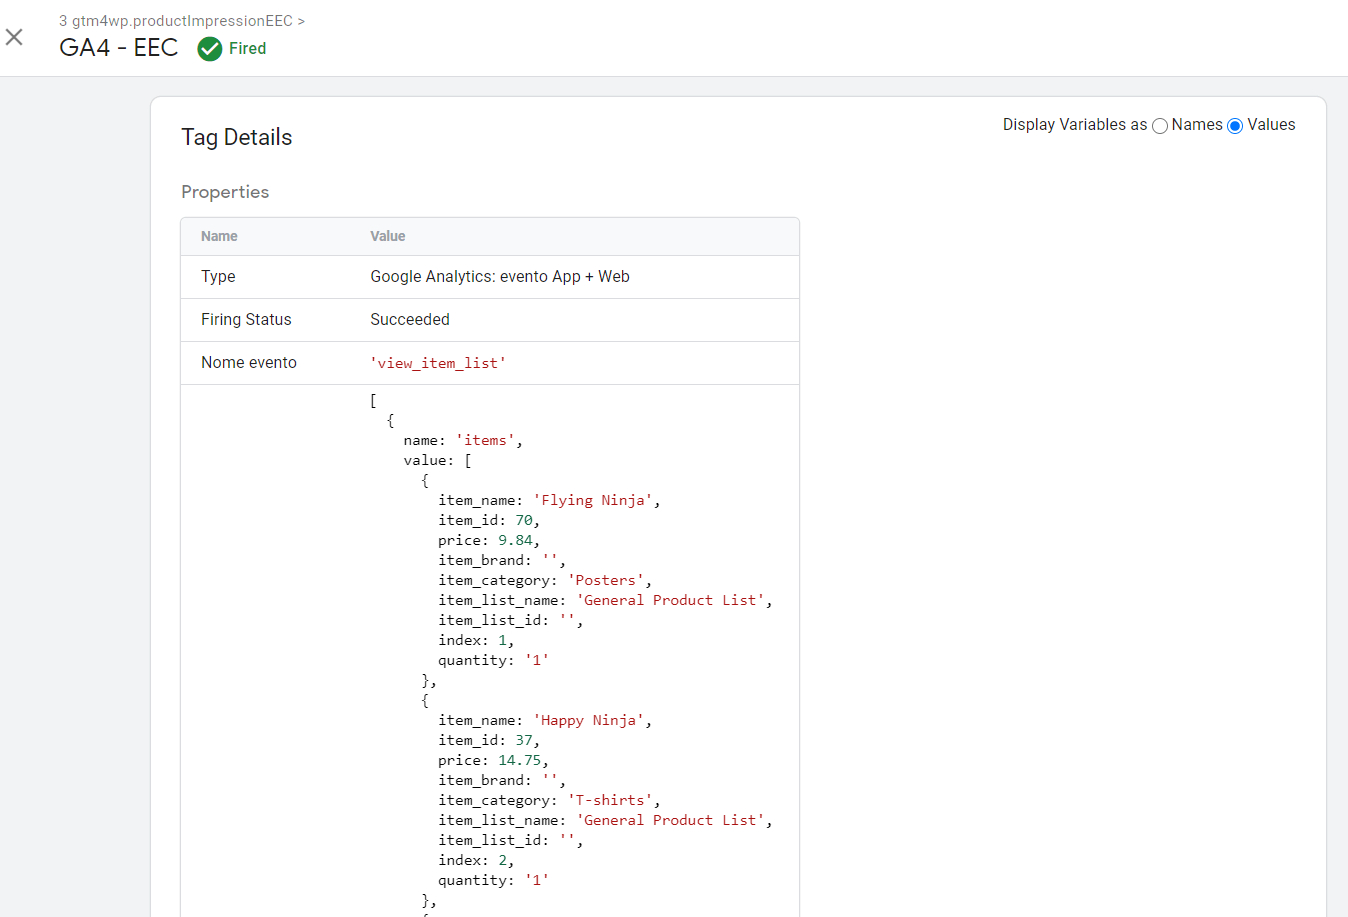
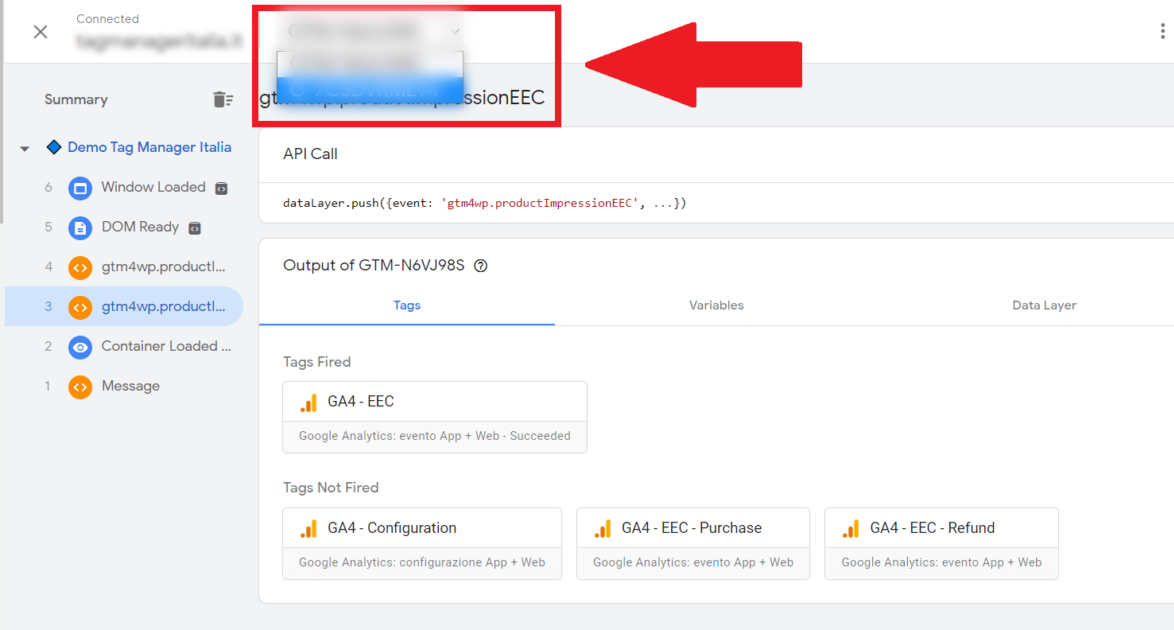
As you can see, product impressions are handled. Events number 3 and 4 have the tag GA4 – EEC fired:
If you click the Tag and check the Values, you can notice that both the name of the event view_item_list and the values of the items are handled correctly:
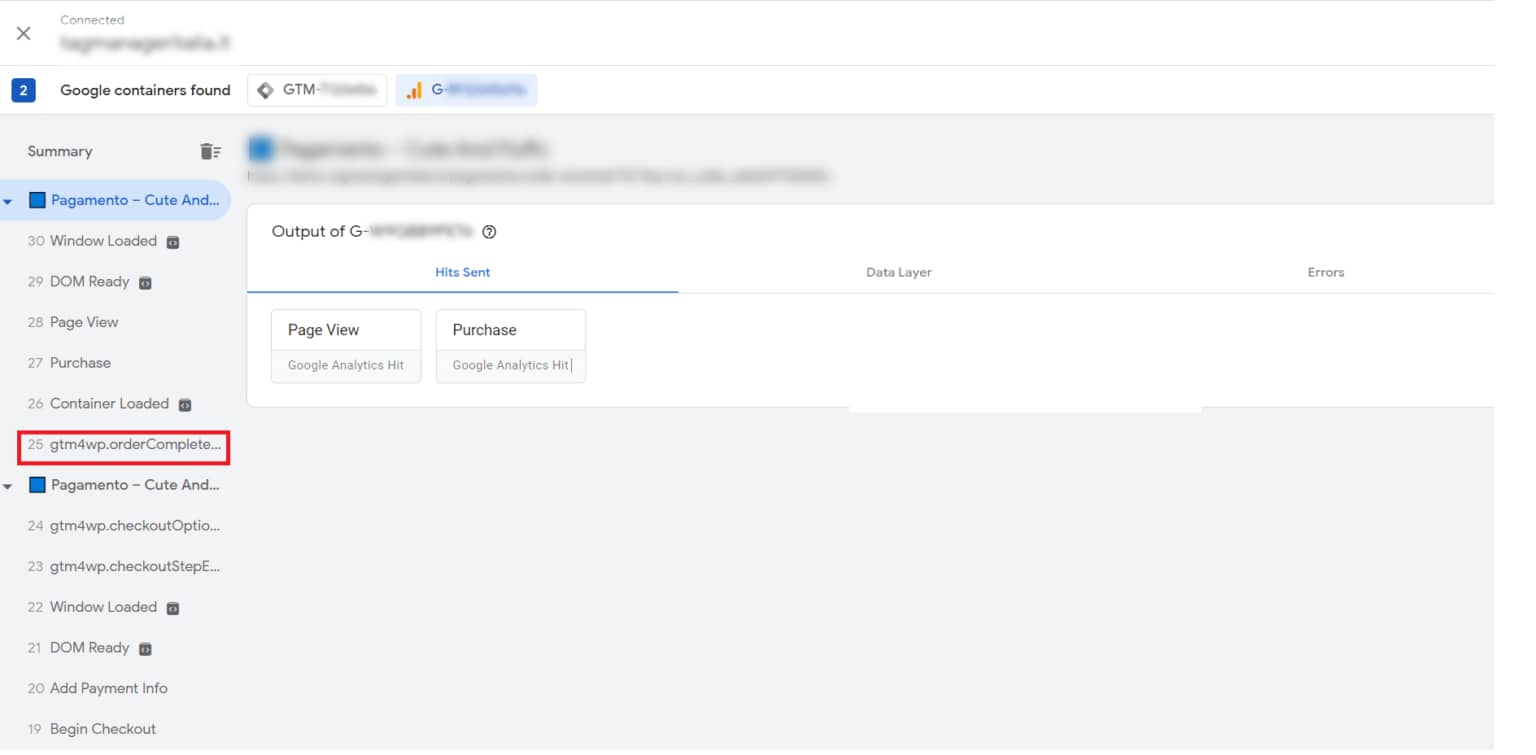
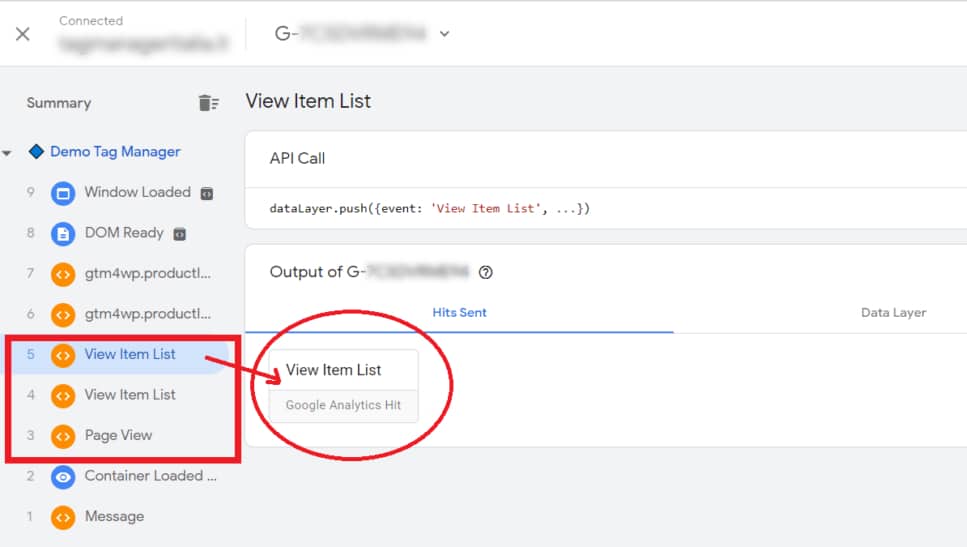
Now it’s time for the final test: let’s check if Google Analytics 4 actually receives the values.
To do this, just change the GTM code to the GA4 code on the Tag Assistant.
Now you will see all the Hit Sent in Google Analytics 4.
In detail, I have the values 3, 4, and 5 which correspond to the GA4 event:
Page View
View Item List
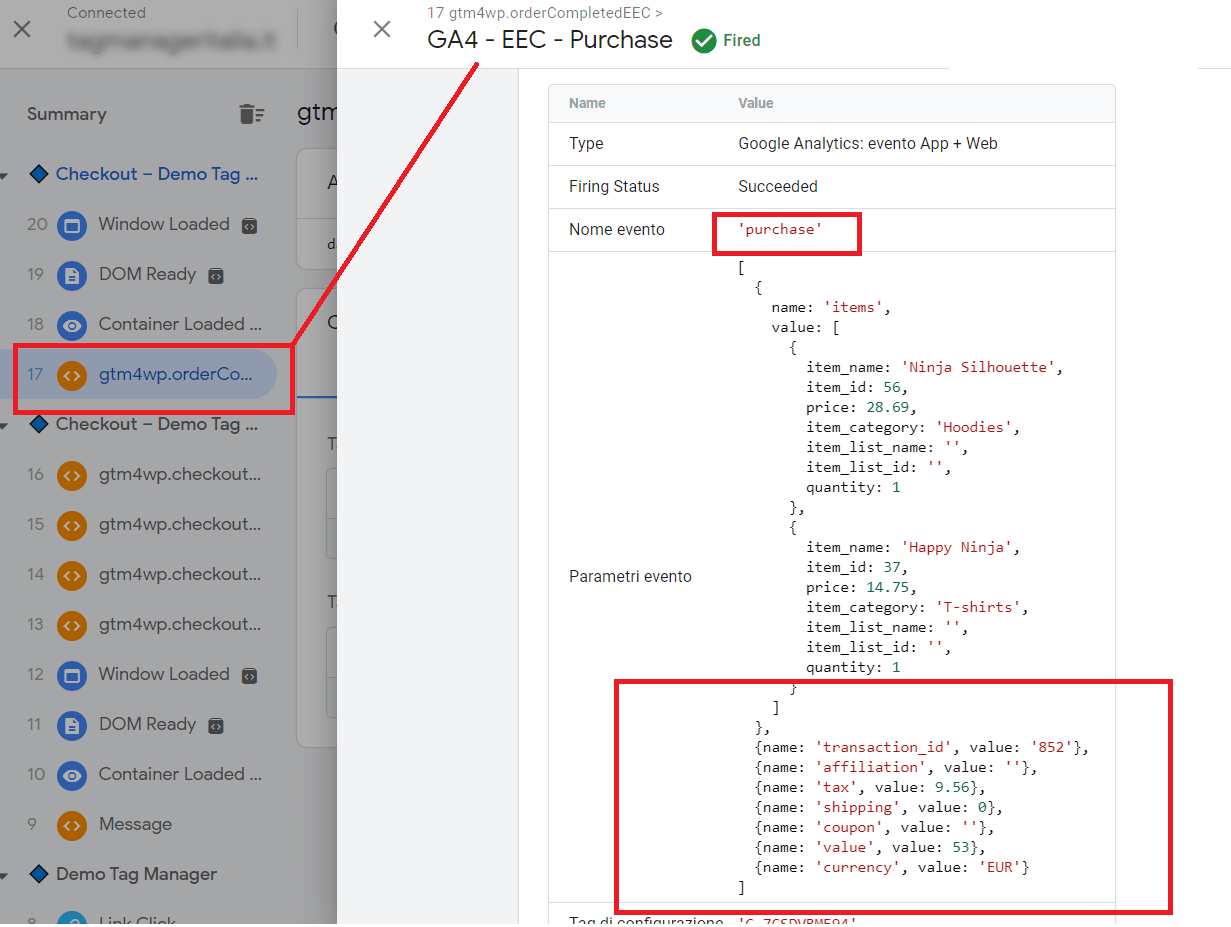
What about the purchase? That works too 🙂
Conclusion
Well, now you have no more excuses! You can track your e-commerce with Google Analytics 4 and start exploring all the new features of the new version of Google Analytics.